You need a subwoofer if your existing car stereo system is missing some "punch". You also need a subwoofer if your main speakers are struggling to reproduce deep bass. This guide will tell you the ins and outs of installing your first car subwoofer.
A subwoofer is a loudspeaker designed to reproduce low-frequency sounds. These are the sounds your smaller speakers were not designed to reproduce. We use a subwoofer to free up main speakers from the burden of producing deep sounds. Those smaller speakers can reproduce musical instruments and vocals.
Learn More: What is a subwoofer? Subwoofers Explained!
Here’s everything you’ll learn in this guide:
- What tools you’ll need to work on your car
- How to choose a subwoofer and enclosure
- How to choose the proper amplifier
- How to get power to the amplifier
- How to get a signal to the amplifier
- How to hook the amplifier up to your subwoofer
- How to test and tune your system, including troubleshooting common tasks
What Tools And Supplies do I need to install a subwoofer in my car?
Interior disassembly:
- It is a good idea to keep a Haynes or Chilton’s manual for your car handy. The exploded views of the disassembled dash are helpful when installing a system. A modern dashboard is tricky.
- A set of screwdrivers in both Phillips and flat and in different sizes. Some cars may need Torx bit drivers as well.
- A set of sockets, socket extensions, and a ratchet. Many cars use a 10mm bolt in the interior. Many older General Motors cars will use a 7mm bolt. Some even use Torx head bolts.
- A drill with bits. You will be punching through an unused plastic panel or grommet in the vehicle's firewall. Hit up youtube for “amplifier install in [make model year]” to guide you through the firewall. Be prepared to drill into plastic or rubber.
Electrical hookups:
- A good crimping tool. Crush the crimp against the wires and then cover with a good heat shrink to contain any stray strands of wire. We don’t want any shorted connections!
- Many amplifiers need a screwdriver to install the power/ground/remote. Others come with the required Allen key in the box.
- Panel pulling tools so you don't scratch or crack your interior panels.
- A digital multimeter for setting the amplifier gains.
Additional supplies:
- Colored tape. You’ll need to know where the wires start and end. This is more important for signal wire than others.
- Zip ties. Secure the wires with zip ties to an adjacent OEM wiring loom.
- Self-tapping screws and some sealant. You will be installing a fuse holder and also ground wires for your amplifier.
- Crimp-on terminals. These are useful for keeping stray strands of wire contained.
- An Amplifier wiring kit. someone’s already made wiring choices and packaged them up for you.
How do I choose a subwoofer and an enclosure?
First answer the question: “How much space am I willing to lose?”
You need to choose a subwoofer and enclosure that won’t interfere with your day to day life. If you have other hobbies, such as camping or sports, or you have active children: the subwoofer may “get in the way”. Be sure you can fit everything into the car with the subwoofer in place.
Then answer the question: “How much money am I willing to pay?”
A good subwoofer and enclosure combination can be inexpensive. Fit the subwoofer to the car. Getting louder requires more power. You may need more power handling if you have a larger vehicle or a sports car with a loud engine. You need more subwoofer in these vehicles than you do in a compact hatchback.
When it comes to features on a subwoofer, “less is more”. Most people will buy a pre-loaded subwoofer and enclosure combination at first. It's easy to plug and play. Don’t “listen with your eyes”, get a quality subwoofer and enclosure that doesn’t show off. Avoid excessive LED lights and plexiglass panels.
Choose a subwoofer that will strike a balance with the rest of your stereo system. Most beginners are adding a subwoofer to a factory stereo (or to a “deck and fours”), so there’s no need to “go big or go home” here. A lower power (150-250w RMS) subwoofer will suffice.
Choose a subwoofer whose enclosure size fits your vehicle and your lifestyle. Most people would be happy with a single 10-inch subwoofer in a small sealed enclosure. The box should be in the 0.5-0.6 cubic feet range. It doesn’t take up much space and provides enough “oomph” to make music fun.
How do I choose an amplifier?
Learn More: Three Features you Need in a Subwoofer Amplifier (And three that are nice to have)!
Choose an amplifier that makes power the subwoofer can take at the subwoofer's impedance. Match the RMS power ratings. If your 4-ohm subwoofer is rated at 250w RMS, choose a mono amplifier in the 250-300 watt RMS range, rated for 4ohms. One can also use a two-channel amplifier in bridged mode for a lower power subwoofer. Make sure the bridged amplifier can handle the subwoofer's impedance. If the impedance is too low, the amplifier will go into protect mode, or it may self-destruct.
Also, you will need to consider how you’re hooking the amplifier up to the rest of your system. If you have a factory stereo, you will likely be tapping into speakers for the signal. Your deck should have RCA terminals at the back of the deck if you have an aftermarket deck. Almost every amplifier can accept RCAs. Many amplifiers can accept both RCAs and speaker level signals.
You'll need a line out converter if you are using an amplifier without speaker level inputs.
It's a good idea to find an amplifier that has a signal-sensing turn-on when connecting to a factory stereo. This way you don’t have to tap into the steering column for a wire that becomes +12v with the key on.
How do I get power to the amplifier?
Overview: You want to connect the amplifier's +12v power lead directly to the battery. You will need to install a fuse within 18” of the battery under the hood. You need to run the wire through the firewall.
Do not skip the fuse.
Finally: You will also need to “ground” the amplifier to the car chassis.
Amplifier wiring kits are available. The kit will usually include everything you need:
- fuse holder,
- fuse,
- a thin “remote turn on” wire,
- 17 feet (5m) of thick power wire,
- 3 feet (1m) of thick ground wire,
- a ground screw,
- and crimp on terminals to keep everything neat.
- Some kits will also include an RCA patch cable and speaker wire.
Please choose a kit made with copper wiring. Avoid copper clad aluminum (CCA) wire. CCA introduces more resistance than does copper. You can get around this by using CCA cabling that’s twice as thick as copper. The problem is you don't save any money. Spend the extra money on “Oxygen Free Copper” or OFC.
Steps for power and ground:
- Set the parking brake and disconnect the vehicle’s battery
- Pull up the trim panels holding down the edges of the vehicle’s carpet on both sides.
- Pull the carpet back from the firewall and then from the edges of the interior of the car
- Remove the vehicle’s rear seat bottom if it’s not a passenger van or minivan.
- On the same side of the engine compartment as the battery, find a grommet or unused panel in the firewall. Poke a hole in this grommet or panel large enough for the amplifier power wire.
- Secure the fuse holder to the vehicle chassis between the battery and the hole in the firewall.
- Push the power wire through the hole until you can grab it from the passenger compartment. Slowly pull enough wire to reach the taillights.
- Secure the amplifier to the vehicle. Popular locations include the rear seatback or trunk floor.
- Connect a terminal to the end of the power wire. Plug this into the +12v terminal on the amplifier.
- Connect the power wire to the fuse holder.
- Connect the fuse holder to the battery’s +12v.
- Sand a small patch of vehicle paint for a ground connection.
- Use a terminal on the ground wire. Use a self-tapping screw to secure the ground wire to this sanded area on the car. Cover this in sealant to prevent rust.
- Terminate the other end of the ground wire with a crimp-on terminal. Connect it to the ground terminal on the amplifier.
How do I get a signal to the amplifier?
You need to connect two pieces here. You need the musical signal and you also need the “turn on” signal.
Connecting an amplifier to an Aftermarket deck
Connecting an amplifier to an aftermarket deck is much simpler than a factory deck. Locate the RCA jacks on the deck. Find the one labeled "subwoofer". If that doesn't exist, use the jacks labeled "rear". Connect the Right and Left RCA patch cables to the corresponding jacks on the deck and the amplifier.
Then connect the remote turn-on wire between the amp's input and the deck's output.
Connecting an aftermarket amplifier to a Factory Stereo
Factory decks generally do not have RCA jacks. We need to get a speaker signal from the deck. We need to cut and crimp our way into the speaker leads. If you don't have easy access to the speakers, find the wires in the dash. Google will help you determine which wires are speaker leads.
If you can, choose an amplifier that can turn on with the input signal. This uses the factory stereo amplifier DC offset to replace the remote wire.
Older amplifiers without input sensing will need a switched +12v lead for remote turn-on. Older cars generally have a switched wire ready to go. Newer cars use a "bus". You'll need to piggyback on a fuse in the fuse box for this switched source.
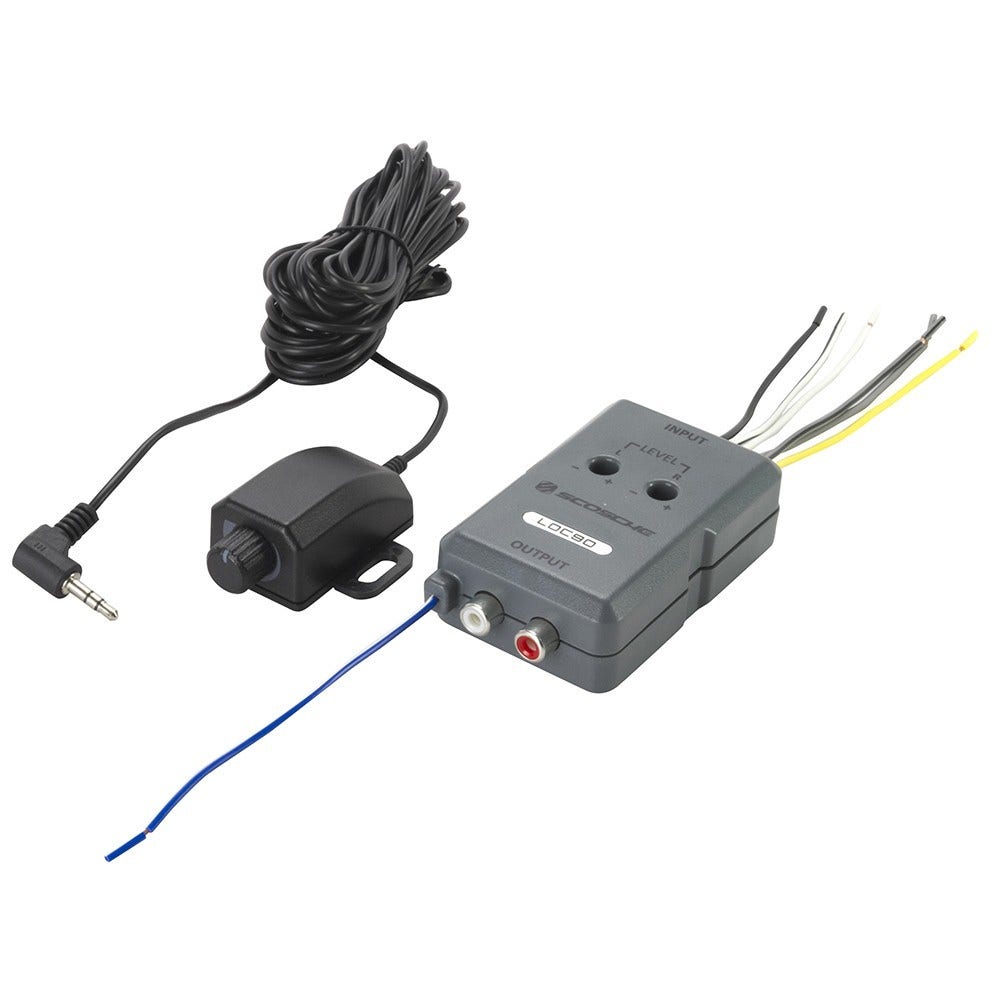
If your amplifier lacks speaker-level inputs, you will need a line-out converter. A line-out converter takes a speaker-level signal from your deck and transforms it into RCAs for your amp. Some newer line-out converters listen for the input signal DC offset to provide a remote turn-on lead. This eliminates a wire.
At any rate: set the gains with a digital multimeter. You don’t want to clip the signal sent to the subwoofer.
How do I connect the amplifier to the subwoofer?
After you have the amplifier installed, terminate the ends of a length of speaker wire. One end with spade lugs for the amplifier, the other end with some form of pin or plug for the subwoofer box terminal. Connect the wire to both the box and the amplifier.
Test and Tune
Now for the fun part. Let’s make sure everything is working.
Do not re-assemble the car yet.
- Hook up the battery.
- Start the car.
- Check to see that the radio turns on and off properly
- Check to see that the amplifier turns on when the radio is on
- Turn up the volume and listen for the subwoofer.
- If the subwoofer is functioning, skip to “button the car back up”
Otherwise, refer to Troubleshooting below
Troubleshooting
If the amplifier isn’t turning on:
- Check the fuses.
- Check to see that the remote wire is showing +12v when the radio is on.
If the amplifier is entering protect, check the subwoofer’s voice coil with a DMM. You should see the impedance.
If the subwoofer isn’t playing, check the connections. Make sure you’re getting a signal to the amplifier. Hook up a full-range speaker to the amplifier and see if there’s any sound coming out at higher frequencies.
Button the car back up
- Zip tie wires to factory wiring loom
- Replace the carpet
- Replace the trim panels
- Replace the back seat
- Set the amplifier gain
Final Thoughts
Safety is paramount. Don’t cut corners. Install fuses. Use wire terminals to hold back stray strands of copper. I don’t want to see power wires in door jambs. I don’t want to see ground wires pinched underneath the bolts that hold your car’s seats in place. Skipping safety guidelines when installing an amplifier can result in a car fire. Let's keep our cars unburned, okay?